We use cookies to offer you a better browsing experience, analyse traffic and personalise content. Read how we use your data in our privacy policy.

Managing (web-) fonts differs slightly between using your own fonts as well as Google and Adobe. This is why we have four sub-stacks within the Font stack:
- Web Fonts for your own fonts - either created by yourself or bought from any vendor of web fonts
- Google Fonts
- Adobe Fonts
- Embedded Fonts for subsetting and base64 embedding fonts into CSS
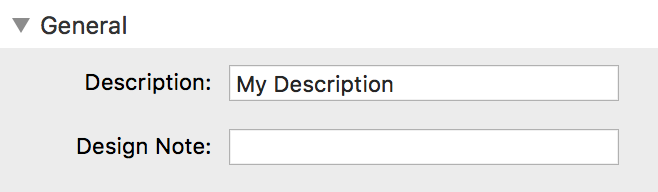
The General section is the same for all Font substacks, exceptions are indicated.
Under Description you can enter a short text which will be displayed in Edit mode. This helps to identify the purpose. In Note you can add additional information, it is not displayed anywhere else, however.
Google Fonts and Adobe Fonts only -
Dislplay Font in Edit Mode: loading these fonts in edit mode can make the editor jumpy or, in the worst cases, unresponsive. This is why this switch is turned off by default. If you want to see these fonts in edit mode, enable this setting.
Dislplay Font in Edit Mode: loading these fonts in edit mode can make the editor jumpy or, in the worst cases, unresponsive. This is why this switch is turned off by default. If you want to see these fonts in edit mode, enable this setting.

If you have problems with other settings overriding your Font settings, you can force your settings to override everything else. Use this only if nothing else helps and remember, it is on a last-come-first-served basis: if there is a setting which uses the Force after this one, it wins!

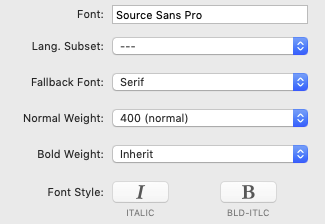
- Font: enter the name of the web-font exactly as it is shown on fonts.google.com, i.e with all capitalisation and spaces
- Lang. Subset: specify an additional optional language subset to be loaded
- Fallback Font: select the font type to be used in case the specified font cannot be loaded. This is particularly helpful in edit mode with the setting Display Font in Edit Mode turned off
- Normal Weight: specifiy the font weight for normal
- Bold Weight: specify the font weight for bold
- Font Style: by selecting Italic and/or Bold Italic, the respective font subsets will be loaded additionally (if supported by the font)
This tutorial assumes that you are familiar with the workings of Adobe Fonts, particularly how to create a "Web Project". Further information how to do this can be found here.
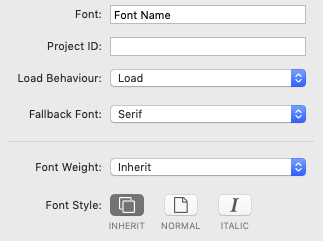
- Font: enter the name of the web-font exactly as it is shown on TypeKit, i.e with all capitalisation and spaces
- Project ID: enter the ID of your project which you created on Adobe Fonts earlier. See their documentation about where you can find the Project ID. This field is only visible if "Load Behaviour" is set to "Load"
- Load Behaviour: select whether you want to load the kit or not. Since a kit can contain multiple fonts, you would have several instances of the Adobe Fonts stack on your page, each one pointing to a different font within your project. However, it makes sense to load the project only once, which should be done on the first instance. For any following instances choose "Already Loaded"
- Default Weight: specifiy the default font weight
- Font Style: by selecting Inherit or Normal or Italic, the respective font subsets will be loaded
With this stack you can use basically all web fonts in your RapidWeaver projects. The stack can be run either in the (simpler) standard mode, which is used for .woff font files, or in advanced mode, in which you can use almost any font file type.
We assume that you have organised the web font using Finder, so that you have access to the individual files.
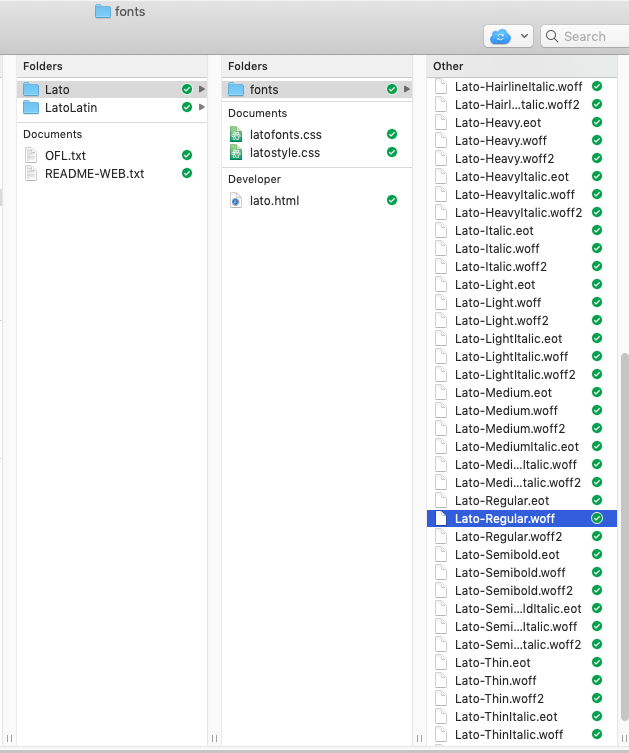
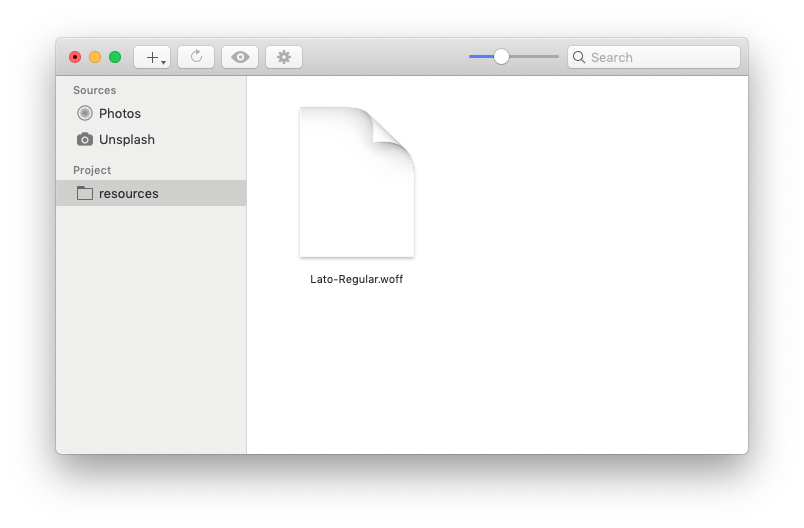
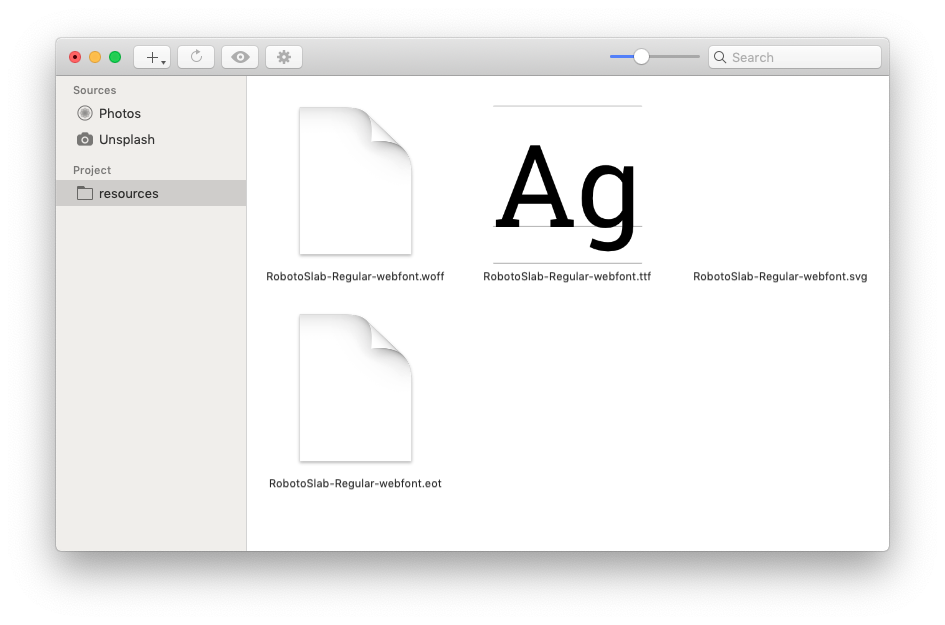
For this example we are using the free font "Lato".
As you can see there are multiple files for each font style and weight. Right now we are only interested in the files with the suffix ".woff".
To get started, locate the font file "Lato-Regular.woff".
For this example we are using the free font "Lato".
As you can see there are multiple files for each font style and weight. Right now we are only interested in the files with the suffix ".woff".
To get started, locate the font file "Lato-Regular.woff".
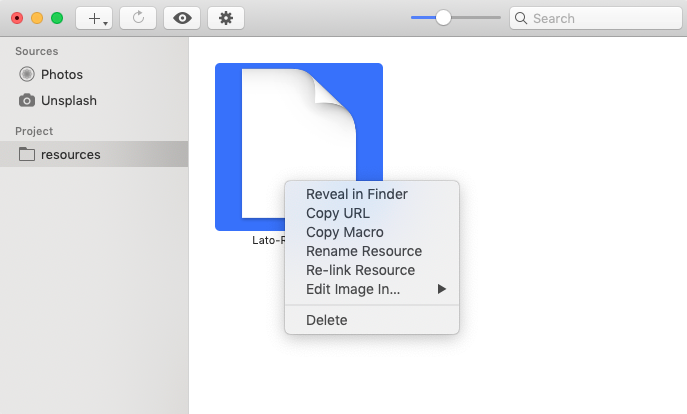
Now drag and drop the font from Finder into the "Resources" window in RapidWeaver.
This next step is important to make the font work in Edit- and Preview mode:
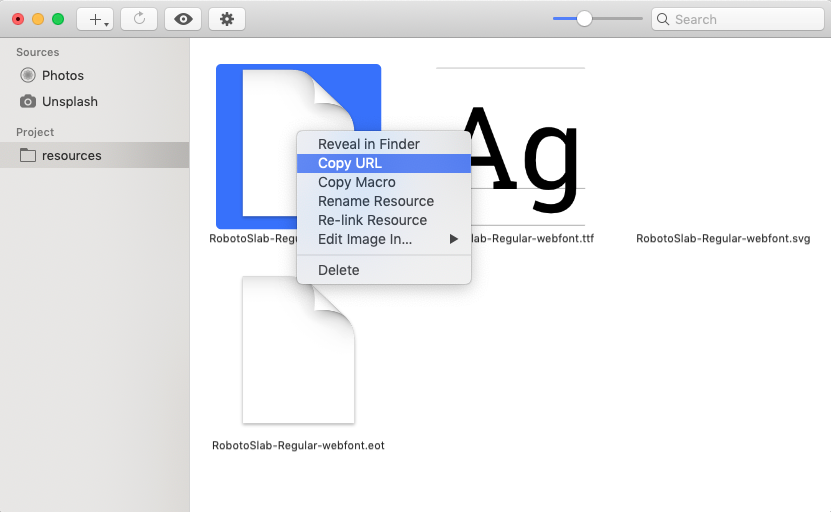
Publish your project to your web-server, then right-click on the font-name and select "Copy URL".
Publish your project to your web-server, then right-click on the font-name and select "Copy URL".
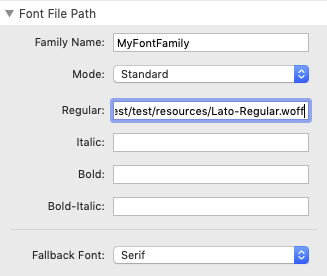
Now paste the URL which you copied in the step above into the input field labelled "Regular".
You can repeat these steps for Italic, Bold and Bold-italic font styles/weights if you have the font files and if you need them.
Lastly, select the Fallback Font.
Now you can continue with the "Scope" section, which is the same for all Font-stacks.
You can repeat these steps for Italic, Bold and Bold-italic font styles/weights if you have the font files and if you need them.
Lastly, select the Fallback Font.
Now you can continue with the "Scope" section, which is the same for all Font-stacks.
While the above is suitable for most situations, you might however have to support exotic or older web browsers.
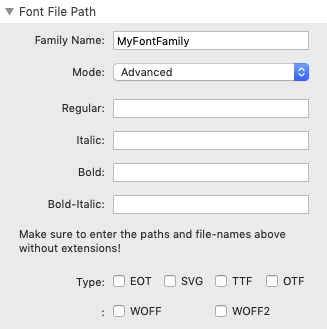
This stack provides a solution for this: change the "Mode" setting to "Advanced" and you get finely grained options for your web fonts.
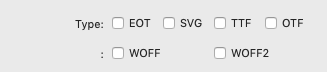
You can select between EOT (for older Internet Explorer versions), SVG (old IOS), TTF (TrueType), OTF (OpenType), WOFF and WOFF2.
You can select between EOT (for older Internet Explorer versions), SVG (old IOS), TTF (TrueType), OTF (OpenType), WOFF and WOFF2.
As before, drag and drop the fonts from Finder into the Resource window in RapidWeaver, marking all required font types as described above, and publish.
Note: in this example, we are using the Roboto font.
Note: in this example, we are using the Roboto font.
Now, also as before, right-click on the font-name and select "Copy URL".
Here comes the difference: after pasting the URL into the appropriate field ("Regular" in this case), delete the extension.

Good!

Bad!
Now select which font types you are including. The extensions and format settings are handled by the stack automatically!
And again as mentioned above: you can repeat these exact steps for Italic, Bold and Bold-Italic fonts.
The Embedded Fonts stack opens completely new options to use almost any font on your web-page. It combines this with an efficient subsetting feature which helps to keep the amount of loaded data at a minimum.
Let's save money!
Using this stack requires a bit more work, though. Work, not money because, as you will see, there is no need to spend additional money for a font tool and other utilities.
Let's save money!
Using this stack requires a bit more work, though. Work, not money because, as you will see, there is no need to spend additional money for a font tool and other utilities.
These glyphs can be reached via their Unicode ID or their hexadecimal code in html.
In Apple Font-Book you can see the Unicode ID while hovering over a character with the mouse.
In Apple Font-Book you can see the Unicode ID while hovering over a character with the mouse.
With all that done, we switch over to Font-Squirrel where we select the "Generator".
Upload your font and select "Expert…"
Upload your font and select "Expert…"

Now switch off all the niceties which Font Squirrel offers (see screen-shot), we only want the "bare" result.
Don't forget to click on "Custom Subsetting".
Don't forget to click on "Custom Subsetting".
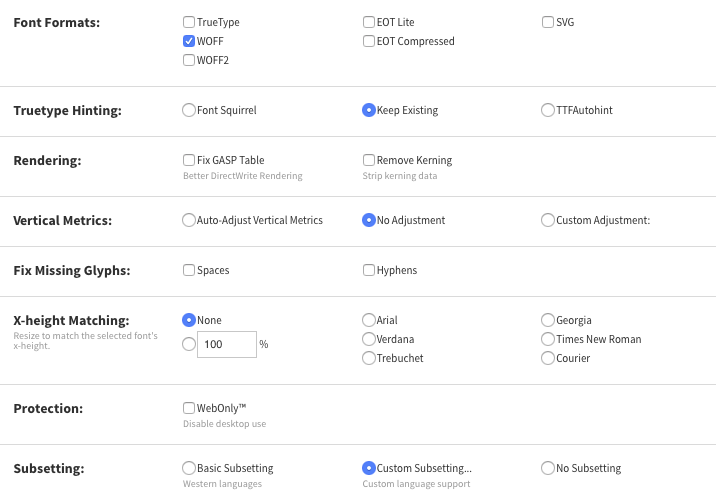
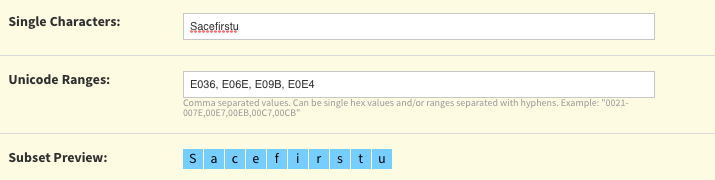
With "Custom Subsetting" checked, scroll down until you see the fields "Single Characters" and "Unicode Ranges". This is where we enter the characters which we actually need in our subset of the font.
In the screen-shot you can see the characters from our example entered in these fields.
In the screen-shot you can see the characters from our example entered in these fields.
The last step here is to accept the "Agreement" and download the kit. What you get is a Zip file containing a few items, two of them are important for us: "fontname-webfont.woff" and "fontname-demo.html". We will get to the latter in a minute.

Applications —> Utilities —> Terminal.app
If you are a Terminal-hater then you can purchase a graphical tool for the steps below in the App-Store. Search for "base64".
You can also drag items from Finder into Terminal to automatically "type" their path and name. Read here how to do that.
Any programming editor should work, such as Atom, TextMate, or even the built-in Text-Edit.
Back in Finder, open the text file with a plain text editor (double-click should do just that) Press cmd-A to select everything and then cmd-C to copy everything to the clip-board.
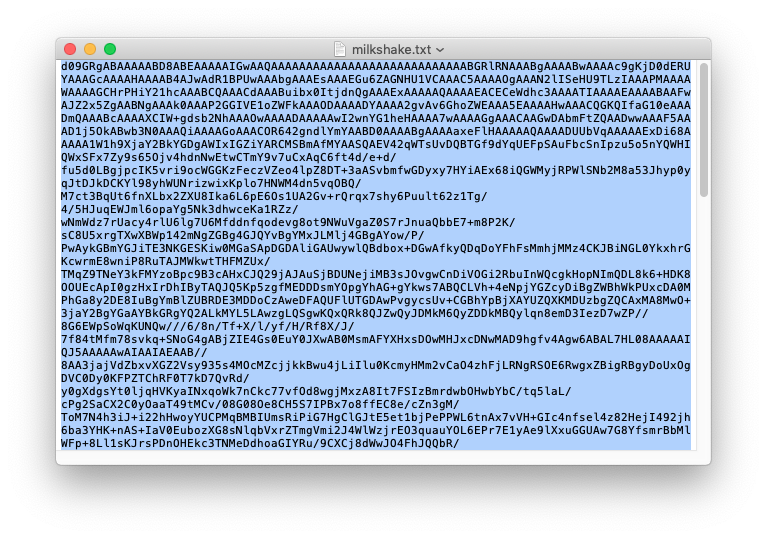
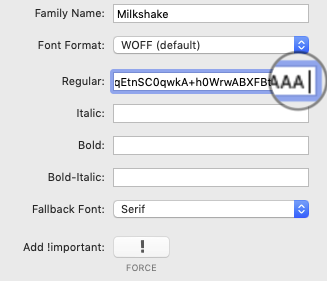
Now over to RapidWeaver and our Embedded Fonts stack, where we paste what we copied in the step above into the appropriate field as shown in the screen shot.
Important Tip: it sometimes happens that there is a "blank" added right at the end. Make sure to delete it.
Important Tip: it sometimes happens that there is a "blank" added right at the end. Make sure to delete it.
If we now enter our text, it is almost as we wanted it, except for the curly characters - yet.
This is where the file "fontname"-demo.html comes in. The word "demo" in the name is misleading because it is much more than that.
Open it in your web-browser and click on the tab named "Glyphs & Languages".
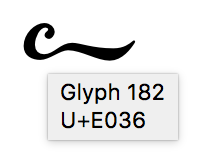
Here you see all the characters which were subsetted, along with their Unicode entities.
This is what just saved you $99!
Open it in your web-browser and click on the tab named "Glyphs & Languages".
Here you see all the characters which were subsetted, along with their Unicode entities.
This is what just saved you $99!
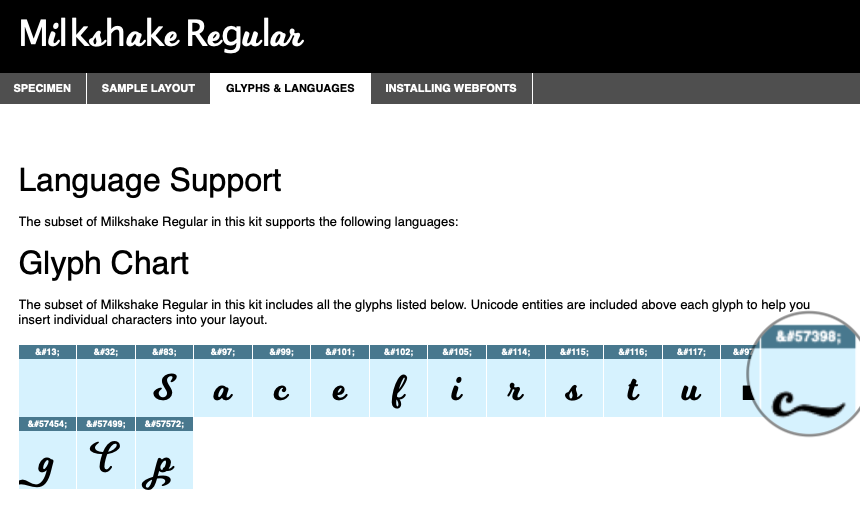
Now replace the characters which are supposed to be curly as shown in the screen shot - i.e. replace the letters with their Unicode Sequence


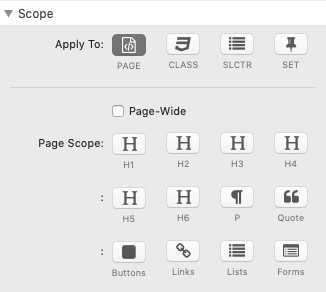
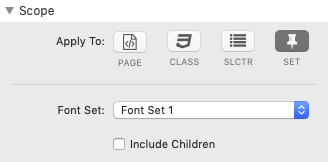
Here we can set the scope to which this particular instance of the Fonticus stack should be applied. This can be an HTML element (Page scope), a CSS class or CSS selector. Or all of them combined.
The selected scope(s) are displayed in the stack instance in Edit mode.
The selected scope(s) are displayed in the stack instance in Edit mode.
Page scope:
You can apply this stack to any of the HTML elements shown by clicking on the appropriate icon in any combination you like.
You can apply this stack to any of the HTML elements shown by clicking on the appropriate icon in any combination you like.
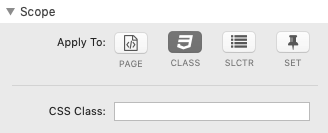
CSS Class scope:
Enter the name of a CSS class which you would like to create or override.
Enter the name of a CSS class which you would like to create or override.
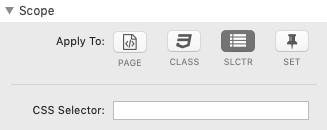
CSS Selector scope:
Enter the name of a CSS selector which you want to create or target, e.g. ".myHeader h3".
Enter the name of a CSS selector which you want to create or target, e.g. ".myHeader h3".
FONT-SET
Select the desired Font Set from the drop-down. Font-Sets are a convenient way to assign fonts to stacks.
Many of the Platform stacks provide corresponding drop downs to apply font sets in their Extra section.
Other than the Platform stacks, our Columator, PriceThing and Barcode stacks support font sets as well.
The Wrap stack can enable any stack to support font sets!
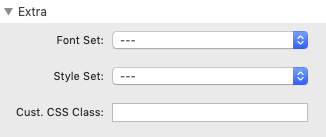
Font Sets in a Platform stack